How to Get Non-Profit Mailing Privileges with USPS: A Guide to PS Form 3624
Want to reduce postage costs for your non-profit? Applying for USPS non-profit mailing privileges can help.
This guide simplifies the process of applying for Nonprofit USPS Marketing Mail Prices.
You can get a copy of PS Form 3624 (Application to Mail at Nonprofit USPS Marketing Mail Prices) from your local postmaster,
your Business Mail Entry Unit, or by clicking this link.
Required Documents for Non-Profit Mailing Application Process
Before you begin, gather the necessary documentation. It’s crucial to be thorough, ensuring that all your documents contain your organization’s EXACT name, mailing address, and other relevant details. Inconsistent information may result in your application being rejected.
Here’s what you’ll need:
- Formative Papers: Articles of incorporation, constitution, or charter.
- IRS Exemption Letter: Proof of exemption from federal income tax.
Additional Supporting Documents (optional)
Some applicants include extra documentation such as:
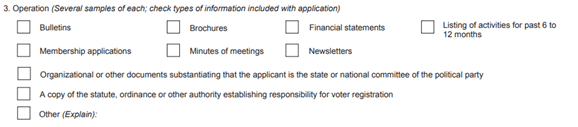
- A list of the organization’s activities from the past 12 months.
- A financial statement detailing receipts and expenditures for the last fiscal year, plus the current year’s budget.
- Additional operational documents: bulletins, meeting minutes, and brochures.
Non-Profit Organization Qualifications
The USPS typically grants non-profit mailing privileges to the following types of organizations:
- Agricultural
- Educational
- Fraternal
- Labor
- Philanthropic
- Religious
- Scientific
- Veterans
- (Some) Political Committees
NOTE Just because an organization seems to fit the list above doesn’t mean it’s eligible:
- Individuals are NOT eligible for nonprofit prices
- Business leagues, chambers of commerce, social and hobby clubs, and certain political organizations usually are NOT
Creating a USPS Business Account
Visit the USPS registration site and provide your name, password, security question, and contact information.
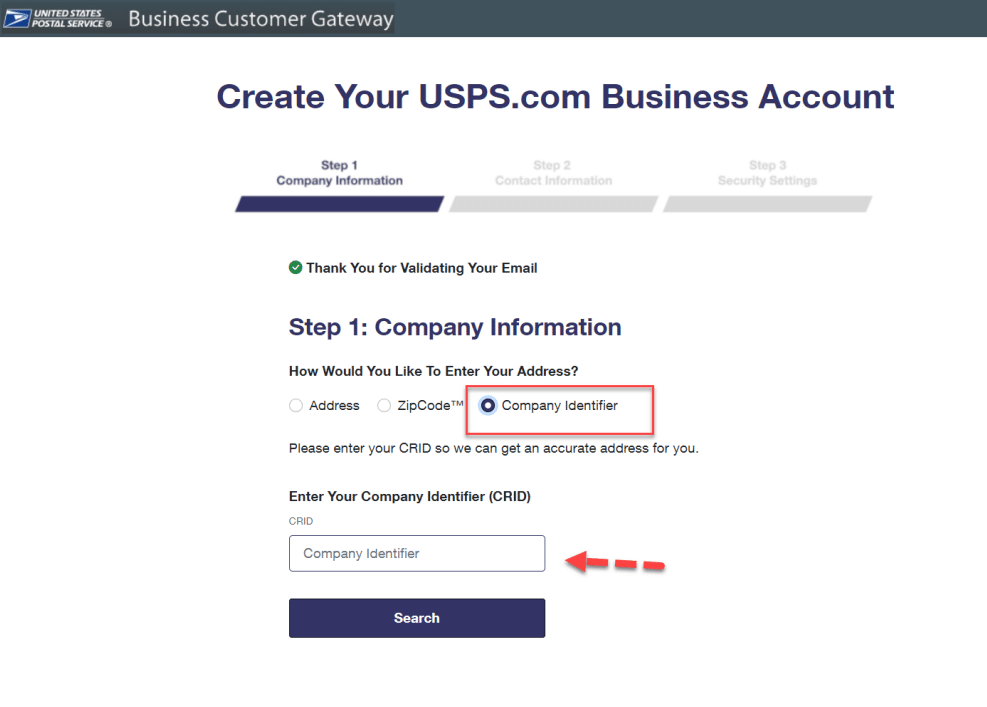
- If you have an existing CRID, click “Company Identifier” and enter your CRID.
- You’re all set up! Log in to the Business Customer Gateway using your new credentials.
Non-Profit Postage Discount Application Process
Once you have logged in or created a USPS Business Account, follow the next steps:
- Navigate to the menu on the left side and select Mailing Services.

- Scroll through the list of services and locate Postal Wizard (PostalOne!) and click “Go to Service”

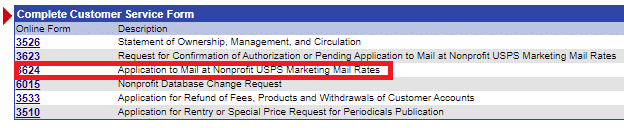
- Look for Form 3624 in the section titled “Complete a Mailing Form.”
- This form is your Application to Mail at Nonprofit USPS Marketing Mail Rates.
Completing PS Form 3624
Here’s how to fill it out:
Section A (Sections 1-8)
Enter your organization’s exact legal name, correct address, and all required information. Remember to be precise with your information. Accuracy is crucial.
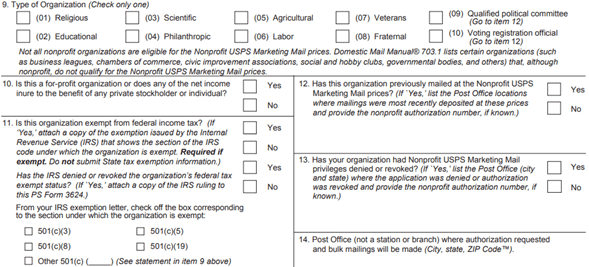
- Section 9: Select one (1) organization type that best fits your non-profit.

- Sections 10-14: Review and select the appropriate choices for your organization.
- In Section 11, you’ll need to specify your 501 classification according to your IRS Exemption documentation. Attach a copy of this document to the form.
- Providing this IRS document goes a long way in giving USPS confirmation in your organization’s pre-established nonprofit legitimacy.
- In Section 14, provide the address of the post office where authorization is requested and where your bulk mailings will be made.
- If you’re using Cornerstone Services Inc. (crst.net) for your not-for-profit mailing services, we recommend entering Newburgh, NY 12550.
- If your organization has permits for a specific location, enter that address.
- In Section 11, you’ll need to specify your 501 classification according to your IRS Exemption documentation. Attach a copy of this document to the form.
Section B
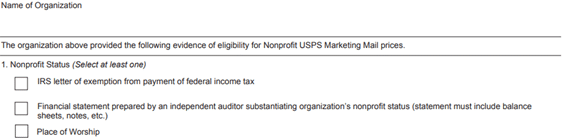
This section requires a list of the documents you’ll be providing. Ensure you’ve gathered everything and review it carefully. Accuracy is essential.
- In Section 1, select which document you have that proves your nonprofit status. Select the correct choice and make sure to attach the chosen document.
- Attach a clean copy of your IRS not-for-profit approval. A signed letter on business letterhead or a d/b/a under an incorporated name can also work, but ensure you include all necessary supporting documents.
- A signed letter on official letterhead stating your organization’s incorporated name is also useful.
- If you’re using a d/b/a (Doing Business As) under an incorporated name, include formal documentation from your Board of Directors and any relevant state incorporation papers.
- In Section 2, provide formal documentation that outlines your organization’s structure. USPS requires clear details about your organization’s purpose, how it is organized, and how it operates.
- Whatever you have that best describes the “primary purpose” of your organization, as well as the details regarding how it is organized and administered.
- It’s important to note that clarity here is vital. The more precise and clear your documentation is, the better.

- In Section 3, check whichever applies to your organization.
- Note: Be thorough when completing this section. The more complete you are, the better it is.
- Exercise caution regarding the inclusion of information that would create the impression that your organization’s not-for-profit status is, in any way, heavily dependent upon governing bodies or agencies.
- Once completed, double-check your form for accuracy, correct any errors, and ensure all documents are clear and legible. Attach the necessary copies and submit your application.
- Mismatch Explanation/Clarifications
- If any document names don’t match your organization’s current name, explain the reason here.

Final Steps
- Review the entire form for accuracy.
- Correct any mistakes, ensure all fields are complete.
- Verify that document copies are clear and properly attached.
- Submit the application once everything is in order.
How to Submit PS Form 3624 Online
- Visit the Business Customer Gateway
- Sign up for an account if you don’t have one, or sign in.
- Go to “Mailing Services” and select “Postal Wizard.”
- Choose PS Form 3624, fill out the form, and attach the required nonprofit documentation.
- Submit your application, and you’ll receive a pending nonprofit number.
Post-Approval Notes
- After you receive your approval, it is recommended that you send out a nonprofit mailing (minimum 200 letters or postcards) at least once every two years to maintain privileges.
- During application processing (after you submitted your completed PS 3624 to the USPS) you may mail at regular rates and request a refund for the difference after approval. As a CRST/Cornerstone client, we can show you how to file this additional paperwork to capture the non-profit discount rates as though they were available when you submitted your application.
Important Notes:
- The USPS may request additional documentation at their discretion.
- Be aware of restrictions on what can be mailed at nonprofit rates, such as limits on advertising.
- Consult your local Business Mail Entry Unit (BMEU) before designing and printing your mailpiece.
- This guide covers the minimum requirements for the application process. We will update it as the USPS implements changes.
For further details, refer to the official USPS guide on Nonprofit Mail.
FAQ
When will I hear back from USPS about my application?
If there are any questions about your application or additional documentation needed, the USPS will have a postal specialist contact you directly. Hardcopy applications can take up to two weeks for your application to be approved. Following the guide and applying online can expedite the process.
What is a USPS PCSC Clerk?
A clerk for The Pricing and Classification Service Center. The PCSC is located in New York City and is an improvement in how The USPS serves customers and field employees regarding mailing standards and pricing options. The PCSC allows for more consistent application of standards, improves customer relations, and streamlines operations.
Will I hear from USPS when their application is accepted?
Typically, the USPS will contact you to let you know your application was accepted.
How do I use BCG to see if I’m approved?
On your main user page in the BCG, you should have a new message in your messages from the USPS informing you that you have been approved.
Do nonprofits get a discount? How much do nonprofits pay for postage?
Yes, nonprofits get a discount. The postage price can vary, though. Click here to calculate your postage.
How to obtain a nonprofit postage permit
Once you are approved, you may mail at Nonprofit USPS Marketing Mail prices at any Post Office location that accepts presorted mailings within the United States. The Postal Service will issue a national Nonprofit USPS Marketing Mail authorization number to you to mail at the Nonprofit USPS Marketing Mail prices. You must display this number in the appropriate space on each postage statement that accompanies a mailing at Nonprofit USPS Marketing Mail Prices
How do I change my Non-Profit information once it’s submitted?
You can use your USPS Business Gateway Account. Login, navigate to Mailing Services, click on form 6015. Alternatively you can follow our non-profit database change request guide.